This simple recipe, courtesy of my friend Stephanie, receives a four star rating! This recipe can be doubled, tripled or quadrupled and extra batches frozen in the marinade for future meals.
3 lb chicken, cut-up or parts of chicken to equal 3 lbs.
4 medium lemons, cut in wedges
1/2 cup olive oil
9 garlic cloves, minced
2 tsp. basil
1 tsp. thyme
2 tsp. salt
1/4-1/2 tsp. cayenne (more or less to taste)
Squeeze the juice from the lemons into a large re-sealable plastic bag - leave the lemon wedges in the bag. Add oil, garlic, basil, thyme, salt and knead the bag to mix ingredients. Add skinned chicken. Seal bag, squeezing out air. Refrigerate 24 hours, turn frequently. Grill or broil chicken, turning every 10-15 minutes until juices run clear. 4 servings.
Basic Salsa can be made using the following recipe. Add other spices to create your own "signature recipe"
14 pounds of tomatoes (scalded and peeled and cut-up)
5 cups of onions (chopped)
10 green peppers (chopped)
2 ounces or more jalapeno peppers (chopped)
1 cup vinegar
1/ 2 cup brown sugar
1/ 4 cup salt
2 teaspoons oregano flakes
1 Cup chopped cilantro, optional
3 teaspoon cumin
3 teaspoons chili power
1 teaspoon garlic powder
10 teaspoons of Clear-Jel
Cauliflower Potato Soup
This soup is delicious. You may cut both the butter and cream cheese from the original recipe in half to lower the fat content. It is still delicious and satisfying. This soup has become a family favorite anytime of year.
4 large potatoes, peeled and quartered
1 head cauliflower, broken into florets
1 cup chopped onion
2 cups water
2 cups milk or alternative
1 tsp salt
1 tsp pepper
1 TB Spike (seasoning usually found in grocery stores)
1 - 8oz. package cream cheese (may halve)
1/4 cup butter
In a large pot, combine the first 8 ingredients. Bring to a boil. Reduce heat and simmer, covered for 20 minutes**, stirring occasionally. Slightly mash mixture with potato masher in pan. Add remaining ingredients and blend well. Simmer for 10 minutes uncovered.
**To save time and nutrients I combine these ingredients into my Duromatic pressure cooker and cook on the second ring for 6-8 minutes. To reduce pressure quickly put the covered pan in the sink and run cold water over it and continue according to the recipe.
1 Cup fruit (fresh or canned) strawberries, apricots, and
peaches are my favorites
1 large apple, peeled
1 Cup. vanilla or strawberry yogurt
Blend the above ingredients in your blender for about one minute or until pureed. Taste the puree and add honey or spices such as cinnamon to taste. (Remember that drying concentrates flavors). Pour puree onto lightly greased fruit leather inserts, or saran covered cookie sheets. Dehydrate overnight at 115 degrees or in a low oven with the door ajar. Leather is ready when no wet places remain. Wrap the leather in saran and freeze. Freeze fruit leather so it doesn't vanish too quickly. Make lots. Children and their friends will love this snack and beg for more.
NUTTY BUTTER BALLS
Dried fruits are concentrated in natural fruit sugar; nuts
are high in fat. Yet dried fruits are high in minerals and nuts
high in protein and essential fatty acids. To learn about what
kinds of nuts and dried fruits are best to buy for good nutrtion,
consult p. 11-12 of LUNCHES
AND SNACKS by Sue Gregg.
This recipe from Sue Gregg, used by permission, is a family
favorite.
1. Chop together in small pieces in blender or by hand:
1/2 Cup date dices
1/4 cup cashews
` 1/4 cup walnuts
1/4 cup pecans
1/4 cups wheat germ, raw or toasted
1/4 cup rolled oats, uncooked
1/4 dried coconut, unsweeteneed, optional
2. In a large mixing blowl blend together thoroughly with a large mixing spoon:
3/4 cup peanut butter
2 TB honey
1 tsp. vanilla
1/4 cup nonfact dry milk powder
3. Gradually mix chopped mixture into peanut butter mixture with large mixing spoon. When you can no longer mix easily with the spoon. Knead mixture well with your hands into a smooth ball.
4. Shape into walnut-size balls; refrigerate until firm on a cookie sheet lined with wax paper. Store in a plastic gag or covered plastic container and referigerate.
NUTRITION QUIZ: What nutrients are dried fruits and nuts especially h9igh in? What is an essential fatty acid (see p. 100)? Name the two important essential fatty acids. Why should dried fruits and nuts be eaten in small, rather than large, quantities? Why is it healthier to use unsulfured dried fruits (p.11)?
NACHO SNACK
Another family favoraite snack from Sue Greggs LUNCHES
AND SNACKS.
SPECIAL TIP: Most taco chips are not made from whole corn. Look for chips made with stoneground cornmeal (this is whole corn), and, if possible, also with canola oil. Avoid chips made with hydrogenated or partially hydrogenated oil such as shortening, or coconut oil. Some chips are made with less salt. Look in supermarkets and health food stores.
Amount: 1 serving
Oven: 325� F - about 10 minutes
1. Top chips with cheese and salsa; heat in oven at 325� for about 10 minutes or until cheese melts:
1 oz (about 3/4 cup) taco chips or Corn Chips
1/4 cup grated cheddar cheese
1 tsp. salsa, to taste
2. Garnish with CHOPPED GREEN ONION, IF DESIRED.
^*^*^*^*^*^*^*^*^*^*^*^*^*^*^*^*^*^*^*^*^*^*^*
Snack Time!
by Leanne Ely
It's summer. They're home. They're whining and most of all,
they're constantly hungry. So what's a mom to do?
Feed 'em!
Kids need snacks, but not constant grazing. You need to make
sure the snacks are healthy and are going to do them some good,
nutritionally. Just giving them the junk that they clamor for
from watching too much TV is going to keep them eating
continually. It makes sense, if you think about it. When your
children (or you for that matter) don't get the nutrition
necessary, their bodies are still craving those nutrients and
will keep signaling that it's time to eat-even after downing a
bag of Doritos and drinking a whole liter of Pepsi. They might
be temporarily full-but never satisfied because the body was
never fed. See why good nutrition is so important?
So let's get a grip on this summertime food issue. Not having
a
plan (as we well know!) is a recipe for disaster. You know how
to make a grocery list-how about adding some of these items on
your list this week?
Veggie Ranch. I think my son will eat anything with
ranch
dressing on it. It's not my very favorite thing in the world
nutritionally, but if you blend it up with some non-fat cottage,
you've got a fairly decent dip. Add baby carrots, celery sticks,
broccoli flowerettes and even some cherry tomatoes and you have
a veggie platter they'll love. Keep your ready-to-go veggies
(separated in big plastic zip-top bags) and dip (in a container)
within easy reach and let that be your first answer when they
ask. Remind your children to pour their dip into their own bowls-
you just KNOW they're going to double dip!
Favor Fruit. Summer is fruit season. Snip some grapes
from the
bunch and they have a great snack to go. A banana is a season-
less fruit and easy to grab, too. Watermelon is perfect this
time of year with the heat and everything-why not have it sliced
up and cold in the fridge, ready to go? Ditto that idea with any
melon. You might even make up a fruit salad of honeydew and
cantaloupe. My troops love this treat and grab the plastic bowl
and help themselves when it's in the fridge. And don't forget
the perennial favorite: apple slices dipped in peanut butter.
Pop up. I am a huge fan of popcorn. Lots of roughage
(like your
grandma used to say) and a fun snack that won't take major bites
out of your budget, too. Use an air popper (way cheaper than the
microwave kind and none of those nasty hydrogenated fats either)
and add a teeny bit of butter. We also add a little grated
Romano cheese. My kids love this!
Nuts to you. I keep raw almonds in the fridge and will
mix some
almonds with dried apricots. Talk about your fiber count-yee
haw! Plus the added bonus of all those nutrients. Great snack
for
kids and adults alike!
Cheese Whiz! Not that icky stuff you squirt out on a
cracker.
But string cheese and cheddar cubes, for starters. American
cheese--its more "product" than real cheese. For optimal
digestion, cheese should be aged over 60 days. That should be
enough to scare you away!
Creamed New Potatoes & Peas
"Enjoy the bounty of the Spring Garden!"
Makes 4 servings, double or triple as needed.
15-20 new potatoes (Or regular potatoes cut up)
1 onion, chopped
1-2 Cups baby spring peas or snow peas
1/2-1 tsp dill weed
1-2 cups chopped ham or cooked smoked sausage, optional
White Sauce (makes 2 cups)
4 TB butter or coconut oil
4 TB flour, whole grain preferred
2 Cups milk, or water, or leftover potato water
salt and pepper to taste
1. Cook as many new potatoes (or regular potatoes) as needed to feed your family in a Duromatic pressure Cooker for about 5 minutes and allow the pressure to come down naturally. OR, boil the new potatoes in salted water until tender, about 15-20 minutes.
2. Meanwhile, saute one chopped onion in 2 TB butter or olive oil. Set aside.
3. Prepare white sauce in a small sauce pan, by melting the butter, then stir in the flour and allow to bubble while stirring for about one minute. Gradually and slowly while stirring, add the liquid. Bring to a boil, and boil for one minute. Add salt and pepper to taste.
4. Combine the white sauce with the sauteed onion, cooked new potatoes, and 1-2 cups of baby spring peas or snow peas.
5. Add dill weed and adjust seasonings to taste.
6. Add chopped ham, or kielbasa type sausage to make this a more solid main dish.
Sprinkle gelatin into cold water in a saucepan. When water is absorbed, bring mixture to a boil and stir into blended lukewarm water and milk mixture (about 110�F). Add yogurt or starter and blend until smooth. Pour into Yogourmet jar and incubate for 4 hours. After 4-6 hours the mixture should be set. Test with a spoon, rather than jiggling. Set yogurt should be refrigerated. This recipe will set more firmly as the yogurt cools. Add 1/4 to 1/2 C. sweetener or flavorings to mixture before incubation if you wish to make flavored yogurt. Try orange, lemon, almond, maple, or vanilla flavorings or combine yogurt with homemade jam. I have found that you may use yogurt from an old batch to start a new batch but the incubation time often takes longer because there are less live acidophilus organisms. This process of using yogurt as a starter may be repeated many times before fresh starter is needed.
I like this easy recipe because it is so easy and versatile; perfect for a company breakfast. Powdered eggs can be substituted for fresh eggs and no one will be the wiser. If you have children age 6-12, this is an easy recipe to let them �help� you with.
1 cup boiling water
3/4 cup chopped dried apples, apricots, dates, raisins or currants
4 TB butter
6 eggs
1-1/4 cup milk
1/4 tsp. salt
2 TB honey
1 tsp. vanilla extract
1-1/2 cup flour (freshly milled whole wheat pastry or kamut if available)
Powdered sugar or berry jam or jelly, if desired
Preheat oven to 400 degrees. Pour boiling water over dried fruit to cover. Let stand to soften about 5 minutes. Drain. Meanwhile, melt butter in the microwave in a 9�X13� glass baking dish. Allow the butter to evenly cover the entire bottom of the baking dish. In a blender, combine eggs, milk, honey, salt, and vanilla. Blend lightly to mix. Add flour. Mix well in blender. With a wooden spoon stir in drained, chopped dried fruit. Pour the batter into the prepared baking dish. Bake 20 to 25 minutes until puffy and golden brown. If desired, sprinkle with powdered sugar, or serve with strawberry, raspberry, or your favorite jam or jelly. Serve immediately. Makes 4-6 servings.
1. Use organic herbs, fruits, and vegetables if at all possible OR grow your own. Conventional produce should be thoroughly washed or peeled.
2. Carrots, cabbage, apples, and grapes have a high moisture content and therefore make a good juice "base".
3. Vegetables such as tunrip, rutabaga, broccoli, parsely, onions and celery should be juiced in samll amounts because of their strong flavor.
4. Fresh juice should be consumed right away in order to receive maximum health benefits from the live enzymes and nutrients.
5. Limit green juices to approximately 1/4 of the juice because they are powerful drinks which can cause nausea nad headaches if you are unaccustomed to them.
6. It is suggested that two glasses per day be consumed for health maintenance and four glasses per day to speed healing.
For more information, please contact marilyn@urbanhomemaker.com or call 1-800-552-7323 or visit us at www.urbanhomemaker.com/catalog
Copyright 2004-all rights reserved.
LACTO-FERMENTED SALSA
A Perfect way to use the bounty of the Fall Harvest of Tomatoes! Makes one quart, double, or quadruple if you have lots of tomatoes and peppers.
Does not require canning! Let your nose be your guide.
4 medium tomatoes, peeled, seeded and diced
2 small onions, finely chopped
3/4 cup chopped chile pepper, hot or mild
6-8 cloves garlic, peeled and minced (optional)
1 bunch cilantro, chopped
1 tsp dried oregano
juice of 2 lemons
1 TB sea salt
4 TB whey, if not available, use an additional 1 TB salt
1/4 cup filtered water.
Peel tomatoes, cut along the "equator" of the tomato, sqeeze out the seeds. Dice up tomatoes, and combine with all the other ingredients, and place in a quart-sized, wide-mouth mason jar. Press down lightly with a wooden pounder or large spoon, adding more water if necessary to cover the vegetables. The top of the salsa mixture should be at least 1 inch below the top of the jar. Cover tightly and keep at room temperature for about 2 days before transferring to cold storage. Make several jars if you have plenty of tomatoes, as this salsa is wonderful. The same Salsa can be made using canned tomatoes in the winter time.
Here's what you need: Whole wheat rotini (or similar) pasta
(about
8 oz.), 1 can (about 14 oz.) artichoke hearts (drained and chopped),
1 jar (about 7 oz.) roasted red peppers (drained and sliced),
1 small
can sliced black olives, turkey pepperoni (about 4 oz.), fat-free
or
light Italian dressing, shredded parmesan cheese.
To prepare: Cook and drain pasta, rinse with cold water.
While pasta
is cooking add remaining ingredients except cheese to large bowl.
Add cooked pasta, toss well (with enough dressing to coat lightly).
Serve either chilled or at room temperature. Sprinkle with cheese
before serving.
TRY SERVING WITH: Whole wheat rolls.
Prep time: 10 minutes
STRAWBERRY SPINACH SALAD
This recipe has been adapted from SIMPLY
IN SEASON, Recipes that celebrate fresh, local foods in the
spirit of More-with-Less..has infinite variations. Strawberries
and spinach are the only two requirements. Use whatever other
ingredients you like and have on hand.
4 or more Cups spinach or other mixed greens
1 Cup straberries
2 green onions, sliced
1 small red onion (cut into thin rings)
1 or more garlic, minced
2 TB sunflower seeds (raw or toasted)
1/2 Cup bacon pieces, crumbled
1/2 Cup chopped walnuts or slivered almonds (toasted)
1/2 Cup grated cheese or 1/4 Feta Cheese crumbled
sliced cucumbers, optional
avocado slices, optional
1 cup cooked chopped chicken or turkey
Balsamic Dressing:
1/4 cup honey
2 TB sesame seeds
1 TB poppy seeds
1/4 Cup balsamic vinegar (wine vinegar is fine)
1/4 Cup olive oil
dash of Worcestershire sauce
salt and pepper to taste
Combine ingredients in a jar with tight fitting lid and shake
well.
ALWAYS MAKE SURE ALL EQUIPMENT IS ON HAND BEFORE STARTING. There is nothing worse than coming up short on lids or sugar, spices or some other needed ingredient once you get started in canning.
STORE HAVESTED VEGETABLES in plastic bags and chill quickly if you are not going to get to them right away.
TRAY FREEZE VEGETABLES - If you are faced with huge quantities of vegetables and not enough time, try tray freezing them. Wash the vege, dice and/or chop. Spread the veges out on cookie sheets and place in the coolest part of your freezer and allow to freeze. Once frozen, veges can be tossed into freezer bags and/or vacuum packed.
TRAY FREEZE BERRIES - Whenever strawberries, blueberries, and raspberries come into season, I wash them in cold water, drain well in a collander and tray-feeze them on cookie sheets without sugar. When frozen solid, they go into freezer bags. Berries can be used later for jams, jellies, pies, puddings, smoothies, etc.
APPLESAUCE - The fastest and easiest method of making applesauce is with a hand-cranked strainer. Apples need not be peeled or cored, just cooked until soft and pureed in the strainer.
PUREES - Overripe, unblemished fruits can be frozen whole or sliced to make quick purees when defrosted. Fruit puree is perfect for smoothies, pancake and waffle toppings dressings for fruit salads, and other
PUMPKINS AND SQUASH - will store well until late fall or early winter when you have more time for processing.
HEAT SYRUPS FOR FRUITS - Try using a coffee maker pot to pour the syrup into the jars, instead of utilizing a laddle to save time and mess!
FREEZING STRAWBERRIES - To keep strawberries from absorbing large amounts of water, hull the berry AFTER wasing.
DEFROSTING BERRIES - Please frozen berries into a bowl, cover with sugar, and then cover the bowl, to minimize exposure to air and promote better color, texture, and flavor retention.
If you decide to try out dehydrating and making your own healthy fruit leathers with no additives, you will be surprsied just how quickly these nourishing snacks will disappear. May I suggest you be sure to have plenty of fruit leather inserts or Teflex sheets on hand so you can make lots?
MARILYN'S FAMOUS FRUIT LEATHER RECIPE
This fruit leather is VERY easy to make and kids love it. A simple, nutritious snack!
1 large apple, washed, quartered, and seeds removed
(Skin removal is optional.)
1 16 oz can of favorite canned fruit such as apricots OR 2
Cups Fresh Fruit of choice
1 - 8 oz container of vanilla or favorite fruit flavored yogurt.
Combine all ingredients in a blender; blend until the mixture is pureed. This will make 3-4 cups of puree. LIghtly oil fruit leather tray or Teflex sheet. Pour mixture onto tray and dehydrate at 110 - 130 � F or until the mixture becomes leathery with no wet pockets. (A warmed oven can also be used, with the door ajar.) Usually this will take overnight if dehydrating starts after dinner. Dehydrating time will vary based on how much puree is poured on the fruit leather tray, and local humidity conditions. When the leather is dry, remove it from the tray, wrap in cellophane, and ENJOY! This yummy treat won't last, so make several trays.
This is a great treat for camping, hiking, car trips, and just plain snacking!
For more information about preserving, I recommend the following resources:
The Busy Person's Guide to Preserving Food - Easy Step by Step Instructions for Freezing, Drying, and Canning by Janet Chadwick. $14.95
The Big Book of Preserving the Harvest - 150 Recipes for Freezing, Canning, Drying, and Pickling Fruits and Vegetables, by Carol W. Costenbader. $18.95
How to Dry Foods - A Complete book on Dehydrating by Deanna Delong $15.95
Stocking Up - The Third Edition of the Classic Preserving Guide by Carol Hupping and the Staff of the Rodale Food Center.$20.00
Keeping the Harvest - Preserving Your Fruits, Vegetables, and herbs by nancy Chiofi & Gretchen Mead. $14.95
For more information, contact me at marilyn@urbanhomemaker.com or call 1-800-552-7323.
Sign up for our free bi-monthly newsletter filled with recipes, information, product specials, book reviews, articles by published authors and more.
Adding Meaning to Your Easter Celebration
Making Jesus the center of your family's celebration can present
a challenge when images of the Easter Bunny are so prevalent.
Parents must take special measures to help kids understand that
Jesus is the giver of Easter gifts-His love, His sacrificial death,
the salvation we have through Him-not a big rabbit who hands out
candy and colored eggs.
Here are some ideas for putting the spiritual significance back into your Easter celebration.
* Put a spiritual twist on the tradition of decorating Easter eggs. Before dying the hard-boiled eggs, use crayons to write an Easter message on each egg. Because the crayon wax keeps the dye from adhering in those spots, your "Jesus is Risen" and "Jesus Died for You" messages will show through clearly.
* If your church does not celebrate Holy Week, attend Holy Week
services at a church that does. Or celebrate each day as a family
by reading passages of scripture that recount what each special
day commemorates.
* Attend an Easter cantata presented by a church other than the
one your family normally attends. This allows family members to
experience a celebration of Easter that is different than that
to which they are accustomed.
* As a family, choose a few craft projects that emphasis the meaning
of Easter. Do an Internet search or check out books from the library
for ideas. Use your completed projects to decorate your home for
your family celebration.
* Celebrate the Resurrection of Christ by doing the kinds of things
Jesus came to earth to do. Extend God's love to others by visiting
the elderly and sick, gathering up clothing to take to a homeless
shelter, or making and delivering food baskets to families in
need.
* If you don't usually do so, attend a sunrise service so your
family can experience a little of what Jesus' followers must have
felt the morning they found the empty tomb. Afterwards, enjoy
a big family breakfast in celebration of the Risen Lord.
* Do some research on how the Resurrection is celebrated in other
cultures. Turn the Easter celebration into a learning experience
by enjoying traditional Easter foods and activities from another
country.
* Many churches make Easter crosses by attaching real flowers
in some fashion to a wooden cross to symbolize the new life brought
to us through Jesus' death. Make your own family Easter cross
by cutting out a large cross from brown construction paper. Let
the children use construction paper, markers, crayons and paint
to create flowers to decorate it.
BYLINE:
Nancy Twigg is a Christian speaker and author who loves inspiring
others to live more simply. Adapted from Nancy's book, Celebrate
Simply: Your Guide to Simpler, More Meaningful Holidays and Special
Occasions.
Bunnies and Ham and Eggs, Oh My!
Bunnies and Ham and Eggs, Oh My!
by Tawra Kellam
http://www.livingonadime.com/
It’s almost that time of year again. You’re standing, dumbfounded, in front of a mound of hard boiled eggs, sliced ham and chocolate Easter bunnies. You wonder “what am I going to do with 6 dozen eggs, 6 lbs. of ham and 25 chocolate bunnies”. The stress of it is almost enough to send you to bed for a week--or at least tear most of your hair out. Here are a few ideas and recipes from www.LivingOnADime.com to help you avoid both of those.
Leftover Bunnies: Take a rolling pin to them and crush the life out of them. Then use the crumbs to sprinkle on ice cream, use in milk shakes, stir a few in a mug of hot chocolate, use in place of chocolate chips for making cookies or melt for dipping fruit and candy.
Leftover Ham: Save bone for bean or split pea soup. Make ham salad, chef salad or ham sandwiches. Chop and freeze to use in: potato salad, scrambled eggs, omelets, to top baked potatoes, for potato soup, scalloped potatoes, au gratin potatoes, pasties or pizza- with pineapple.
Top tortilla with ham, salsa, and cheddar cheese and warm, for hot ham and cheese sandwiches.
Leftover Eggs: Make potato salad, tuna salad, pasta salad, chef salad, spinach salad with eggs and bacon, deviled eggs, golden morning sunshine or fill tomatoes with egg salad.
Golden Morning Sunshine
2 cups white sauce
4 eggs, hard boiled and chopped
Make white sauce. Once the white sauce has thickened, add eggs. Serve on toast.
White Sauce
¼ cup dry milk
2 Tbsp. flour
dash salt
1 cup cold water
1 Tbsp. margarine
In a covered jar, combine dry milk, flour and salt and mix well. Add water. Shake until all the ingredients are dissolved. Melt margarine in a 1 quart sauce pan. Stir in flour-milk mixture and cook over low heat until mixture thickens and starts to bubble. Keep stirring until thickened completely.
Tawra Kellam is the editor of DiningonaDime.com
More Easter Themed Activities:
1. To learn to dye Easter eggs with natural colors, CLICK HERE.
2. Another fun Resurrection project is Resurrection Cookies.
3. Or make Hot Cross Buns.
4. More Ideas for Adding Meaning to your Easter Celebration.
Challah
Challah is traditionally served at Easter time or for the Sabbath meal anytime, according to author Martha Zimmerman in her book Celebrate the Feasts.
2 TB Saf yeast
3/4 cup warm water
3/4 cup milk
1/4 cup butter
2 TB honey
2 tsp. salt
4 1/2 to 5 cups bread flour or 1/2 whole wheat and 1/2 bread flour
2 whole eggs
1 egg yolk (reserved for glaze)
1 TB poppy seeds
Mix 3/4 cup warm water, 2 eggs and yeast in mixer bowl. Stir in 2 cups flour, beat well, and allow the mixture to sponge (bubble up) for about 15 minutes or more. Meanwhile, heat milk, butter, honey, until the butter melts. Cool to lukewarm. Add these ingredients to the "sponge", add the salt, and stir in enough of the remaining flour to make a soft dough. Knead until the dough is smooth, and elastic but not dry; about 7 -10 minutes. Shape the dough into a ball.
Place the dough ball into a greased bowl. Turn once to grease the top. Cover with plastic wrap and let rise in warm place until doubled in bulk, about one hour. A finger pressed into the dough will leave an imprint when the dough has risen enough. Punch the dough down, divide into thirds. Roll each third into an 18-inch strand. Line up the three stands one inch apart on a large, greased baking sheet. Braid loosely, beginning in center and working toward ends. Pinch ends together and tuck under.
Cover and let rise until double, about 30 minutes. Brush with egg yolk that has been beaten with one TB of water and sprinkle poppy seeds over the egg wash. Bake in a pre-heated 375 degree oven 35-45 minutes.This recipe makes one large braid or two small braids. Recipe can be doubled of tripled if you have a heavy duty mixer. This recipe can also be preapred as is, in a bread machine on the dough cycle and then shaped by hand.
For more more information contact marilyn@urbanhomemaker.com or call 1-800-552-7323.
www.urbanhomemaker.com
Easter Cookies with Bible Lesson
Easter Cookies
To be made the evening before Easter. My daughter did this in her Sunday School Class
and really enjoyed the taste, and remembered most of the symbolism.
You need:
1c. whole pecans
1 tsp. vinegar
3 egg whites
pinch salt
1c. sugar
zipper baggie
wooden spoon
tape
Bible
Preheat oven to 300.
Instructions:
Place pecans in zipper baggie and let children beat them with
the wooden
spoon to break into small pieces. Explain that after Jesus was
arrested He
was beaten by the Roman soldiers.
Read John 19:1-3
Let each child smell the vinegar. Put 1 tsp. vinegar into mixing
bowl.
Explain that when Jesus was thirsty on the cross he was given
vinegar to
drink.
Read John 19:28-30
Add egg whites to vinegar. Eggs represent life. Explain that
Jesus gave His
life to give us life.
Read John 10:10-11
Sprinkle a little salt into each child's hand. Let them taste
it and brush
the rest into the bowl. Explain that this represents the salty
tears shed by
Jesus' followers, and the bitterness of our own sin.
Read Luke 23:27
So far the ingredients are not very appetizing. Add 1c. sugar.
Explain that
the sweetest part of the story is that Jesus died because He loves
us. He
wants us to know and belong to Him.
Read Ps. 34:8 and John 3:16
Beat with a mixer on high speed for 12 to 15 minutes until
stiff peaks are
formed. Explain that the color white represents the purity in
God' s eyes of
those whose
sins have been cleansed by Jesus.
Read Isa. 1:18 and John 3:1-3.
Fold in broken nuts. Drop by teaspoons (you don't want them
too big or it
won't work, so I'm told) onto wax paper covered cookie sheet.
Explain that
each mound represents the rocky tomb where Jesus' body was laid.
Read Matt. 27:57-60.
Put the cookie sheet in the oven, close the door and turn the
oven OFF. Give
each child a piece of tape and seal the oven door. Explain that
Jesus' tomb
was sealed.
Read Matt. 27:65-66. GO TO BED!
Explain that they may feel sad to leave the cookies in the
oven overnight.
Jesus' followers were in despair when the tomb was sealed.
Read John 16:20 and 22.
On Easter morning, open the oven and give everyone a cookie.
Notice the cracked surface and take a bite. The cookies are hollow!
On the
first Easter Jesus' followers were amazed to find the tomb open
and empty.
Read Matt. 28:1-9
Cookies can be left on a very very low temp..like 250 degrees.
and be ready
in a couple of hours...when surface of cookie looks dry and cracked....they
are ready to eat!!!!!
These cookies are quite sweet but tasty!

Remember the children's nursery rhyme that goes as follows?
Hot cross buns! Hot cross buns!
One a penny two a penny - Hot cross buns
If you have no daughters, give them to your sons
One a penny two a penny - Hot cross buns
Hot cross buns were sold in the street to the cry of "Hot cross buns!" around the period in English history dating back to the seventeenth and eighteenth century.
A hot cross bun is a type of sweet spiced bun made with currants and leavened with yeast. It has a cross on the top which might be made in a variety of ways. Using confectioner's frosting, is the most common way.
According to one source, hot cross buns are traditionally eaten on Good Friday, with the cross standing as a symbol of Christ and the resurrection. Have fun with the children and enjoy the process of being together in the kitchen. Here's my recipe for the buns:
Hot Cross Buns
2/3 cup dried currants
3-1/2 to 4 cups whole wheat flour (or half bread flour and half whole wheat
2 TB yeast
1/2 to 1 tsp cinnamon
3/4 cup milk
1/2 cup cooking oil
1/3 cup sugar or honey
1 tsp salt
3 eggs
1 slightly beaten egg white
Frosting (recipe follows)
Cover currants with very hot water. Let stand about 10 minutes or up to one hour at room temperature. Drain well. In a large mixing bowl combine 2 cups flour, yeast, and cinnamon. Heat milk, oil, sugar or honey, and salt until warm (115 to 120�). Add to the dry mixture. Allow to sponge for about 15 minutes if time allows. Add eggs, one at a time. By hand or mixer, stir in currants and enough remaining flour to make a soft dough. Knead until the gluten is developed by mixer or on a lightly floured surface until smooth and elastic, about 6-10 minutes.
Shape into ball. Place in greased bowl. Turn once to grease top. Cover with plastic wrap and let rise in warm place until doubled in bulk, about 1-1/2 hours. Punch down. Cover and let rest 10 minutes.
Divide into 18 pieces. Form smooth balls. Place on greased baking sheet 1-1/2 inches apart. Cover; let rise until double, 30 to 45 minutes. Cut shallow cross in each. Brush tops with egg white. Bake in preheated 375� oven 12 -15 minutes. Remove from baking sheet. Use confectioner's Frosting to make a "cross" on the bun.
Confectioner's Frosting:
2 TB milk
1 cup sifted powdered sugar
1/2 tsp. vanilla
Combine these ingredients together and add milk or water as needed to get a good pouring consistency for the frosting. Place the frosting in a small zip-lock sandwich baggie, clip the corner and use the baggie to squeeze the frosting over the cooled buns in a cross shape. Small children will enjoy this process even if it gets a little messy!
More Easter Themed Activities:
~Yellow-- yellow onion skins, turmeric (½ tsp. per cup water) celery leaves
~Orange--any yellow dye plus beet juice
~Red--beets, paprika, red onion skins
~Pink -cranberry juice
~Blue--blackberries, grape juice concentrate, red cabbage
~Brown--black tea, white oak, juniper berry, coffee, barberry
~Light purple--blackberries, grapes, violets
~Green--alfalfa, spinach, kale, violet blossom plus ¼ tsp. baking soda, tansy, nettle, chervil, sorrel, parsley, carrot tops, beet tops or dip yellow egg in blue dye
Hard boil eggs with 1 tsp. vinegar in the water. Place dying ingredients in non-aluminum pans, cover with water and boil 5 minutes to 1 hour until desired color is achieved. Use enough material to make at least 1 cup dye. Crush ingredients as they boil to extract as much dye as possible. Strain the dye. Most dyes should be used hot. Let each egg sit in the dye until it reaches the desired color. Some dyes will take longer than others to make the desired colored on the egg. Remove the egg and let dry.
Glitter Eggs- Place 1 tablespoon each of glue and water in a cup. Stir the mixture and then paint the eggs with it. Sprinkle with glitter. This can also add sparkle to already dyed eggs!
Decoupaged eggs - Tear small pieces of wrapping paper, napkins, stickers, or clip art. Mix equal amounts of glue and water. Paint egg with glue mixture. Place paper on top and then cover with more glue mixture. Let dry.
Spotted Eggs- Place 1 tsp. of cooking oil in dye. Dip the egg. The oil will cause the dye to make an irregular pattern on the egg.
Waxed Eggs- Dip a portion of the eggs in melted paraffin or candle wax. Then dip them in the dye. Remove from dye. Dry and peel off the wax. The egg will be white on one half and colored on the other half. You can also dip in dye before waxing to get two colors.
Hollow Eggs- Poke a hole in one end of an egg with a very small needle. Poke another slightly larger hole in the other end. Then blow on the small end and the egg will come out the other side. Decorate as desired.
Tawra Kellam is the author of the frugal cookbook Dining On A Dime: Eat Better, Spend Less. For more free tips and recipes visit her web site at http://www.LivingOnADime.com/
More Easter Themed Activities:
To learn to dye Easter eggs with natural colors, CLICK HERE.
Another fun Resurrection project is Resurrection Cookies.
Or make Hot Cross Buns.
More Ideas for Adding Meaning to your Easter Celebration.
Matzah Kugle
This dish is simply delicious. It can be made ahead
and refrigerated. Leftovers are welcome at our house!
6 pieces of Matzah
1 dozen eggs
1 cup sugar
1/2 tsp. cinnamon
1 tsp salt
1 cup raisins
8 grated apples (tart ones are best)
grated rind of 1 orange
1/2 cup melted butter
1 cup chopped almonds
Crumble pieces of Matzah into water and soak until soft (do not drown!); squeeze out the excess moisture with your hands. Beat the eggs. Add sugar, salt, and cinnamon, beating till well blended. Stir crumbled matzahs, raisins, almonds, apples, and orange rind into the egg mixture. Turn it all into a well-greased 9 X 13 pan. Sprinkle more cinnamon and sugar on top and pour the melted butter on top of that. Bake at 350 for about 45 minutes, until firm and nicely brown.
Chicken Soup with Matzah Balls
Chicken Soup Stock
Start with a 4-5 pound chicken or use the back and the insides of the chickens you might be serving.
3 quarts of water
2 onions,
3 carrots
2 pieces of celery, stalks, and tops
1 TB salt
Several good shakes of garlic powder
1/8 tsp pepper
1/2 tsp. dill weed
Clean the chicken thoroughly; clean and cut up the vegetables. Add all of the ingredients to the water and bring to a boil. Then lower the heat. Simmer for 2 hours. Pour the soup through a colander, and refrigerate broth for 2-3 hours, until the fat forms a layer at the top. Save the carrots aside. Remove the layer of fat and return the broth (without the meat) and carrots to the pot to reheat. This will boil down to about 2- 2 1/2 quarts of soup. If you want to stretch it a little, add more water and a few chicken bouillon cubes (when n one is looking). The chicken meat should be cut up and used for salad or chicken casserole recipes.
Matzah Balls (a.k.a. Knaidlekh)
1 Cup Matzah meal
1/2 cup water
1/3 cup oil
4 eggs
1 tsp. salt
dash of pepper
Beat the eggs, add water, oil, salt, and pepper to the eggs; mix well. Add the Matzah meal and stir thorougly. Refrigerate for 1 hour. Bring a pot of slightly salted water to a rolling boil. Form the Matzah meal mixture into 1 " size balls and drop (gently, please) into the broth. First they sink, but then they should rise to the top. Cook 20 minutes. You may set these aside and later add them to the soup, just before serving. Makes about 30 -1" balls.
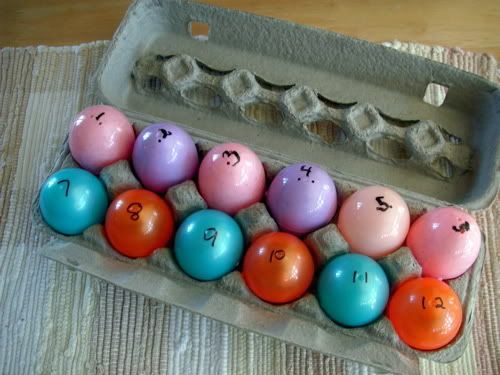 A. You can summarize the story using the "article" in each egg as a prop as you go.
 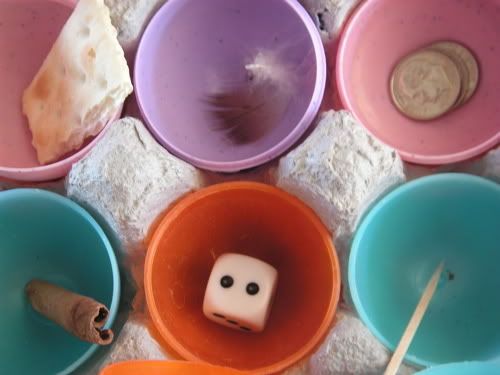 #7 – Dice – When the soldiers crucified Jesus, they took his clothes and played a game to decide who would get his clothes – John 19:23-24