Tips For The Best Bread
Now that you have familiarized yourself with the benefits of baking your own bread, and the basic ingredients needed in yeast breads, read through my tips below for the best bread before you try baking your first whole grain loaf of bread.
Hand Method
Step 1: Read through Marilyn’s Famous Whole Wheat Bread Recipe and acquaint yourself with the directions and ingredients.
Assemble your basic yeast bread ingredients: fresh whole wheat flour, salt, yeast, honey, vital gluten and filtered water.
You are ready to get started!
Marilyn's Famous Whole Wheat Bread Recipe
Hand Method: (yields 2 loaves)
1/3 cup honey
1/3 cup oil
2 1/2 cups warm water
1 1/2 tbsp. SAF Instant Yeast
2 1/2 tsp. salt
6-7 cups fresh whole wheat flour(room temperature)
1 1/2 tbsp. Dough Enhancer, opt
1/3 cup Vital Wheat Gluten, opt
Combine the warm water, yeast, and 2 cups of fresh whole wheat flour in a large mixing bowl. Allow to sponge (see pg. 21) for 15 minutes. Add the honey, oil, dough enhancer, salt and 4-5 cups additional flour until the dough begins to clean the sides of the mixing bowl. This is true whether you are mixing by hand with a wooden spoon or using a dough hook attachment with an electric mixer.
Knead the bread by hand 7-10 minutes or until it is very smooth, elastic, and small bubbles or blisters appear beneath the surface of the dough. It is a common mistake of beginners to add too much flour. When hand kneading, if you will oil your kneading surface and your hands with 1-2 tsp of oil, this will help reduce stickiness and help you avoid adding too much flour.
Form the dough into 2 loaves. Allow the dough to rise in a slightly warmed oven or other warm place until doubled in size, about 30-60 minutes. (Turn the oven on for 5-10 minutes, turn off oven and open door, allowing it to cool down to approx. 100°F.)
Bake the loaves for 25-30 minutes in a 350°F oven. Bread is cooked through when the top, sides, and bottom are nicely browned in color. Over baked is better than under baked.
Step 2: Mixing the ingredients
Pour the water into a mixing bowl and stir in the dry ingredients with a wooden spoon until they are moistened. There is really no perfect order for combining these ingredients but below are some tips for insuring good success with your first efforts at baking whole grain bread. Step 3-Step 8 below will describe the kneading, raising, shaping, baking, and cooling steps in more detail.
General Mixing Tips and Suggestions:
* Use warm water. Best temperature is 110 - 120°F if using SAF Yeast, otherwise 110° maximum. If you are not using Instant or Quick Rising Yeast like SAF, be sure to proof the yeast before using it by mixing the yeast with 1/2 cup warm water with a teaspoon of sugar or honey and allowing it to sit for 10 minutes before using it.
* Use the right amount of flour. Too much flour kneaded into the breads causes dry crumbly bread. Because the moisture content of flours vary, yeast bread recipes will always call for a range of flour. With experience you will learn to recognize when the right amount of flour has been added to the dough, rather than relying on measurements alone.
* Sponging is simply allowing the dough to sit in the mixing bowl to allow the flour to absorb the liquid. Combine the warm water, yeast, and 2 cups of fresh whole wheat flour in a large mixing bowl. Allow to sponge for 15 minutes. This step gets the yeast off to a good start. Set the timer if necessary. Use the “waiting time” to clean up your kitchen or fold the laundry. Don’t worry if the sponge goes longer than 15 minutes. The art of baking bread is flexible. If the baby needs to be changed, or the mailman rings the door bell, and life happens, relax; get back to the bread as soon as you can and don’t fret.
* Measuring ingredients and mixing the dough. Measure the oil into a glass measuring cup before the honey. That way the honey slides out with minimal stickiness. Then add the remaining ingredients and 4-5 cups additional flour. Stir with a sturdy wooden spoon until the bread dough begins to clean the sides of the mixing bowl. Be sure to add the flour gradually to enable it to absorb the moisture.
Step 3: Knead the dough
This process will develop the gluten. The gluten is an elastic protein that enables dough to hold it’s shape when raised. The most difficult aspect of mastering bread baking is learning the kneading technique and knowing how long to knead. Here is how to recognize when the gluten is fully developed: The dough will be smooth and elastic. Take a golf ball sized portion of dough and see if the dough is stretchy and does not readily tear. To improve the gluten content and texture of your bread add vital gluten.
Tips for Kneading the Dough By Hand
Try to get all the flour incorporated within two minutes of mixing so you will have even gluten development. Too little flour will cause the dough to be too sticky to work with, which is your signal to add more flour. Since whole grain flour absorbs moisture more slowly, be sure not to add too much flour, or, as you mix and knead, the dough will become too dry, resulting in crumbly bread. Add more flour gradually, in 1/2- 1 cup portions. It takes practice to add the right amount.
A rhythmic process called “kneading” develops the gluten in the bread dough by straightening the gluten strands and causing them to become smooth and elastic. Place the slightly flattened dough all onto a lightly floured surface, and fold the dough over toward yourself. Press the folded dough together, pushing down and away from yourself with the lightly floured heels of both hands. Give the dough a quarter turn and repeat the process by folding the dough and pressing away, turning and repeating. This “kneading” is a rhythmic motion, repeated many times.
Knead the dough by hand 7-10 minutes or until it is very smooth, elastic, and small bubbles or blisters appear beneath the surface of the dough. It is a common mistake for beginners to add too much flour. When hand kneading, if you will oil your kneading surface and your hands with 1-2 tsp of oil, this will reduce stickiness and help you avoid adding too much flour. Remember, if your dough is too sticky to work with you will need to add additional flour.
A Fool-Proof Way to Knead Your Bread
If you are new to kneading bread dough, an older wiser woman told me how she determined if her bread was adequately kneaded.
She said, “Say the Lord’s Prayer as you knead, making one kneading stroke per word and then repeating the prayer at least twice”. Many ladies have told me that this method alone solved their dilemma of determining how long to knead the dough.
With experience you will eventually master the kneading process and learn to “feel” and recognize when the gluten is developed.
Step Four: Recognizing When The Gluten Is Developed
You can recognize when gluten is fully developed by taking a golf ball sized portion of dough and gently stretching the dough in opposite directions using your thumb and forefinger of both hands. If you can stretch the dough thin enough to see light through without the dough readily tearing, you have sufficiently developed the gluten.
If after 7-10 minutes of kneading the bread dough, the gluten doesn’t seem developed, it is most likely because you are using low protein flour or because you are new at kneading bread dough.
There is no way to increase the gluten content and development at this point. More kneading after a certain point does not mean more gluten development. In fact, it is possible to over-knead the dough, and if this does occur, the gluten begins to break down and the dough becomes a sticky mess.
Finish making the bread according to the instructions below. The finished bread may be a bit heavier and denser than you like, but I suspect the bread you have made will smell wonderful and be delicious even if it is a bit heavy and dense.
Just view this as a “learning experience”. As I have said before, there are no failures in bread baking, only learning experiences. Expect to have them. Bread that we call “learning experiences” is usually enjoyed by the family anyway or it can be salvaged by turning the baked bread into croutons, bread pudding, bread crumbs, or feeding the ducks.
If you find your bread heavier or denser than you and your family enjoy, you will want to add vital gluten into the recipe next time to improve the texture of the bread. Often, baking with Montana grown hard wheat (which is higher in protein content) may solve that heavy/dense bread problem in the future.
Step 5: Let the bread dough rise (1st rising - optional)
When the gluten is fully developed, allow the dough to rise in a greased mixing bowl. Cover the dough with a damp kitchen towel to keep the dough from drying out. This step is often called “proofing” (not to be confused with proofing the yeast). Proofing is a baking term for allowing bread dough to rise, generally outside of the oven. Although this step is optional, proofing will develop texture and flavor, gluten framework, and help make light, fluffy loaves of whole wheat bread. If you are in a hurry, this step can be skipped.
The activity of the yeast ferments the flour, causing the development of carbon dioxide gas to develop. The carbon dioxide is captured by the gluten which causes the bread to rise.
The optimum temperature for yeast activity is 85-100°F so use a slightly warmed oven, top of the refrigerator, direct sunlight or any other warm place, if possible. Otherwise, the first rising period done at room temperature will just take longer, which is nothing to be concerned about. Normally the first rising period takes about 30-60 minutes. (The first raising of the bread can be skipped if you are in a hurry, but flavor and texture of the bread improve with each raising.)
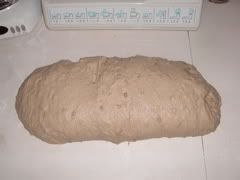
After the dough has doubled in size, punch down the dough, divide it into two equal pieces and shape the loaves. Use 1 tsp. oil on your kneading surface or on your hands when it is time to shape the dough. This keeps the dough from sticking and avoids using excess flour.
 Step 6: Shaping bread loaves Step 6: Shaping bread loaves
After the dough has risen once and been punched down with your fist (this deflates all the air bubbles), you will want to shape the loaves in a round cylindrical shape, the length of your bread pan. (8” cylinder for 8” pans, 10” cylinder, 10” pans, etc.)
I take the dough, stretch the dough around the tops, and sides of the “cylinder” I try to shape with my hands and pinch this stretched dough together, underneath the loaf or cylinder, into a seam. I roll the bread dough shaped into a cylinder like a rolling pin with my hands to make sure all the air bubbles have been removed and the loaf is nice and round and smooth.
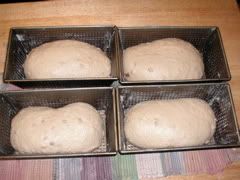
When I’m content with the shape of my loaf, I put the dough. seam side down, into the greased bread pans and lightly grease the top of the loaf with oil or melted butter. For the prettiest highest rising bread loaves, use 8” X 4 1/2” loaf pans filled 1/2 to 2/3 full of bread dough.
 Step 7: Raising the bread loaves (2nd raising) Step 7: Raising the bread loaves (2nd raising)
The loaves are ready to bake when the dough has doubled in size. So if your pan was only filled half full of bread dough, it will be time to bake when the loaves reach the top of the pan. This second raising period, usually takes about 30-60 minutes depending on the temperature of the place you allow the dough to rise.
Don’t be in a hurry and allow the bread to rise too quickly. Rapidly risen bread loaves often have a weak structure and tend to fall or collapse before the baking time is over.
Another way to determine if the loaf is ready to bake, is to lightly press the corner of the loaf with a pinky finger about one half inch. If the dough holds the shape of the indentation, it is ready to bake. If the dough springs back to the original shape, allow more rising time.
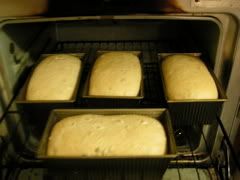
Step 8: Bake the bread!
Bake fully raised bread loaves for 25-30 minutes in a 350°F pre-heated oven. Bread is cooked through when it sounds hollow when tapped on the bottom, and when the top, sides and bottom are a golden brown color.
A more reliable and much less subjective method for determining if the bread is baked through requires the use of an instant read thermometer. I have just discovered this method in the last year, and must say, I have had much more reliable results when using the temperature of the thermometer to determine done-ness.
 The bread is baked through and considered done when the instant-read thermometer reaches 180-200°F. I have used 190°F with consistent results. In general, it is better to overbake bread than to under bake it. The bread is baked through and considered done when the instant-read thermometer reaches 180-200°F. I have used 190°F with consistent results. In general, it is better to overbake bread than to under bake it.
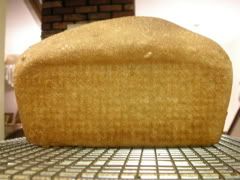
When the bread is completely baked through, remove the loaves from the bread pans to cool on a cooling rack to release steam. If you like, spread some melted butter on the top crust to keep it softer.
For best slicing results, allow the bread to cool completely before slicing. (Who can resist just just one slice of hot, steaming, out-of-the-oven bread?)
After the loaves are cooled, slice as evenly as possible and store in good quality re-useable bread bags. Any bread that will not be consumed in a few days should be frozen or given away, as homemade bread will stale after 3-4 days.
The above information has been excerpted from An Introduction to Baking Bread ebook by Marilyn Moll.
|
|
|
|
French or Italian Bread
This recipe is very basic, simple and delicious main meal accompaniment. Double this recipe for large families!
2 1/2 C. warm water 2 TB Saf Yeast 1...
|
| Created |
2006-03-06 |
Views |
19574 |
| Modified |
|
Id |
|
| Author |
|
|
|
|


